Creating the Code Generator
So far we have constructed a meta-model for our electrical-circuit domain. It enabled us to create models that resembles circuits. Up to this point though there is no actual meaning to the circuits. As humans we can infer certain properties from these circuits, but the models themselves don’t impose any particular interpretation. The meta-model infers the structural semantics, but no behavioural semantics.
There are many potential interpretations and interpreters of our circuit models. In this tutorial we will focus on generating Modelica code that can be used to simulate the dynamic behavior of the circuit in question.
How to Implement the Interpreter?
In webgme the typical extension point for writing interpreters are plugins. The plugin framework and API are designed to
enable both server- and browser-side execution of the same code. At the point where a plugin is executed it will have
access to the context it was invoked and through various webgme APIs; Core, Project, BlobClient etc.
In this tutorial we will create two plugins;
- ModelicaCodeGenerator - Responsible for traversing model hierarchy and extract the data needed for generating Modelica code corresponding to the circuit being interpreted.
- SimulateModelica - Responsible for invoking a Modelica tool that can simulate the dynamical behavior of the circuits. This plugin will also be responsible for communicating back the results to the users.
There a couple of reasons why this is a favourable division. To generate the Modelica code there is no restrictions on where the plugin is executed. The server does not have to have any 3rd party dependencies installed (or have any connected workers with available resources) and the plugin can even run in the browser. For some deployments restricting the set of features to only generate the Modelica code might be favorable. When it comes to writing tests it is typically also easier to divide functionality into separate implementations.
We will start with the ModelicaCodeGenerator here and continue with the SimulateModelica in the Integrating Analysis Tools section.
Generating a Plugin Template
To get a quick start we use the webgme-cli tool in order to create a new plugin. Navigate to the root of the repository created at the beginning of this tutorial and invoke either:
webgme new plugin ModelicaCodeGenerator
or for a Python plugin:
webgme new plugin ModelicaCodeGenerator --language Python
This should generate a range of new files. In both cases these files will be added:
src/plugins/ModelicaCodeGenerator/metadata.json- This json-structure contains information about the plugin and is used by the GUI and plugin-framework. Details about what goes in here is explained in the wikipages.
src/plugins/ModelicaCodeGenerator/ModelicaCodeGenerator.js- This is the code of the plugin itself. The very first lines show the dependencies needed for this code
to run and is using requirejs hence the syntax
define(['path'], function (Module){ ... return ModelicaCodeGenerator;});. The last return statement is the module that this file defines when required by another module for instance the webgme framework must be able to load our plugin. (If you generated a Python plugin - this will still be entry point for the webgme framework.) test/plugins/ModelicaCodeGenerator/ModelicaCodeGenerator.spec.js- This is the outline of a mocha test suite for the plugin and shows how to build up a test context and invoke a plugin from a unit-test.
You might also have noticed that the config/config.webgme.js was modified… In order for the webgme plugin framework
to find our plugin the path to it is added to the configuration file. Note that both config.default.js and
config.test.js load and reuse the added configuration parameters from this file.
Python Plugin
If you generated a python plugin, three python files are generated in addition to the files above:
src/plugins/ModelicaCodeGenerator/run_plugin.py- This script is called by the plugin-wrapper,
ModelicaCodeGenerator.js, which passes down the plugin context via arguments. src/plugins/ModelicaCodeGenerator/run_debug.py- This file can be used as the entry point when debugging the python portion of the plugin.
src/plugins/ModelicaCodeGenerator/ModelicaCodeGenerator/__init__.py- This is where the implementation of the plugin logic goes. The ModelicaCodeGenerator-class is imported and used
from both
run_plugin.pyandrun_debug.py.
It’s important to note that a Python plugin can only run on the server (and not inside the client’s browsers). In your ./config/config.default.js add the following line (right before the module.exports = config; statement:
config.plugin.allowServerExecution = true;
For an overview of how the python bindings is connected, go to the webgme-bindings repository.
The Python API is generated in snake_case rather than camelCase and is completely synchronous so there’s
no need to deal with callbacks or promises. When following this tutorial keep this in mind and more importantly use the
load* equivalents to get*path, e.g. loadChildren-vs-getChildrenPaths and loadPointer-vs-getPointerPath.
First cut on Plugin
The video below shows how to generate the new plugin and modify it so we have a map of all the nodes in the subtree of the activeNode.
The activeNode is the invocation point of a plugin and in the next sub-section we will register our plugin so it’s invokable at Circuits.
(With the node map it is possible to retrieve nodes without any asynchronous function calls. The asynchronous API functions in
webgme do return promises which typically makes the asynchronous functions a bit easier to deal with.)
Click here to open the video in a browser..
Registering the Plugin at Circuits
The generated plugin is available from the browser and the server, however in order to present it to the user on the GUI,
we must register it at the appropriate nodes. In our case we want the ModelicaCodeGenerator to be invoked from nodes of meta-type
Circuit so we edit the value at the meta-node and the registered value will propagate down the inheritance chain to all Circuits.
This video shows how we register the plugin and how we can enable the gme-logger for the ModelicaCodeGenerator in the browser. (Note that after updating the localStorage the page must be refreshed. The page must also be refreshed each time we update the plugin code on the server.)
Click here to open the video in a browser..
Querying the Model
At this point we have the context setup up for our plugin. The activeNode for the plugin will be a Circuit and all
nodes in the sub-tree are pre-loaded in a map where keys are the path (a unique id) to the nodes and values are the
node objects.
To extract data from the model we will be using the Core-API, and it’s highly recommended to read the section on how to use the API at the link.
Before we start extracting the necessary data from the model we need to pin down what we need from our models in order
to, in this case, generate Modelica code. The figure below shows the mapping from the Circuit to Modelica code and
the related Core-API calls. (For simplicity we will leave out the Modelica parameters and use the default values from MSL.)
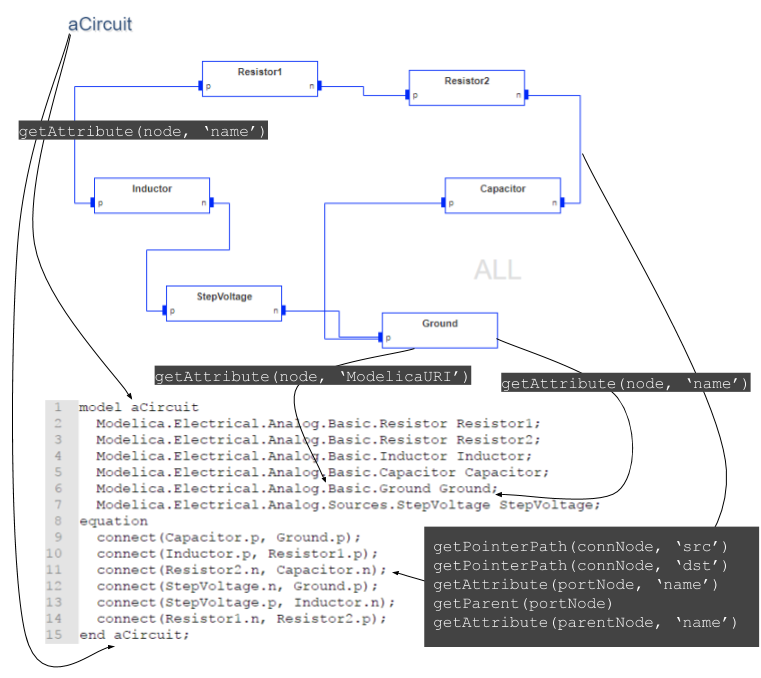
Mapping from a Circuit in our webgme model to Modelica code
We will break up the task into two parts; 1) Extracting the data and 2) Generating the modelica code. The high-level outline of the first part is shown below in the code block where all the extracted data will be stored in serializable JavaScript object.
ExtractName(activeNode)
for all (Node child in activeNode) do
    if (child.metaType is Component) then
        ExtractNameAndModelicaURI(child)
    else if (child.metaType is Connection) then
        [srcNode, dstNode] = GetConnectedNodes(child)
        srcParent = GetParentNode(srcNode)
        dstParent = GetParentNode(dstNode)
        ExtractNames([srcNode, dstNode, srcParent, dstParent])
    end if
end for
The first video shows how to iterate over the children of the Circuit and check their meta-type. Important concepts
here are; self.META property of the plugin which is a mapping from the name of a meta-node to the actual core-node,
and the helper-method isMetaTypeOf which checks if the first node is of type of the second node.
Click here to open the video in a browser..
Next we need to implement the extraction of the data we need in order to generate the Modelica code. For this we will
implement two helper functions that populates the modelJson.components and modelJson.connections array respectively.
At the end we will serialize the data using the standard built-in JSON.stringify function.
Click here to open the video in a browser..
Generating the Code
In the previous section we extracted the data needed to generate the Modelica code in an easily accessible format…
{
  "name": "aCircuit",
  "components": [
    {
      "URI": "Modelica.Electrical.Analog.Basic.Resistor",
      "name": "Resistor2",
      "parameters": {}
    },
    ...
  ],
  "connections": [
    {
      "src": "Resistor2.n",
      "dst": "Capacitor.n"
    },
    ...
  ]
}
To generate the actual code we can use a templating engine such as ejs (an example of how to use this in webgme can be found here). There are also other more fitting templating engines available in JavaScript. For simplicity here, we will make a simple string concatenation to generate the Modelica code.
Click here to open the video in a browser..
Uploading the Generated File
After generating the modelica file we would like to make it available for the user to download. Webgme provides a storage for files through the blob-storage.
In the video below we will show how to upload the generated file onto the storage and how to provide a download link to the invoker of the plugin.
Click here to open the video in a browser..